This post may contain affiliate links. If you choose to make a purchase through these links, I earn a small commission at no cost to you. I do not promote anything I do not believe in or stand behind.
Since March 2020, we’ve spent a lot of time playing at home. For the longest time, I’ve had this dream of adding a grocery store to our play area in the basement. The grocery store is the perfect extension to our kitchen play area. I have fond memories of grocery store dramatic play as a child in school and at home with my brother. It is so much fun to pretend to pick out the food we need to cook, buy the food using a cash register and bag it up. Going grocery shopping is an important part of our daily lives and, as a stay at home mom, my little ones are often with me when I go to the grocery store. Our grocery shopping definitely looks a lot different now since COVID happened, but I still think there is so much learning that can happen when my kiddos are engaged in this form of dramatic play. It’s a great play idea for multiple kids, too. We switch between being the cashier and the shopper/customer. One of the many benefits of dramatic play is learning about the people in the community and the jobs they have!
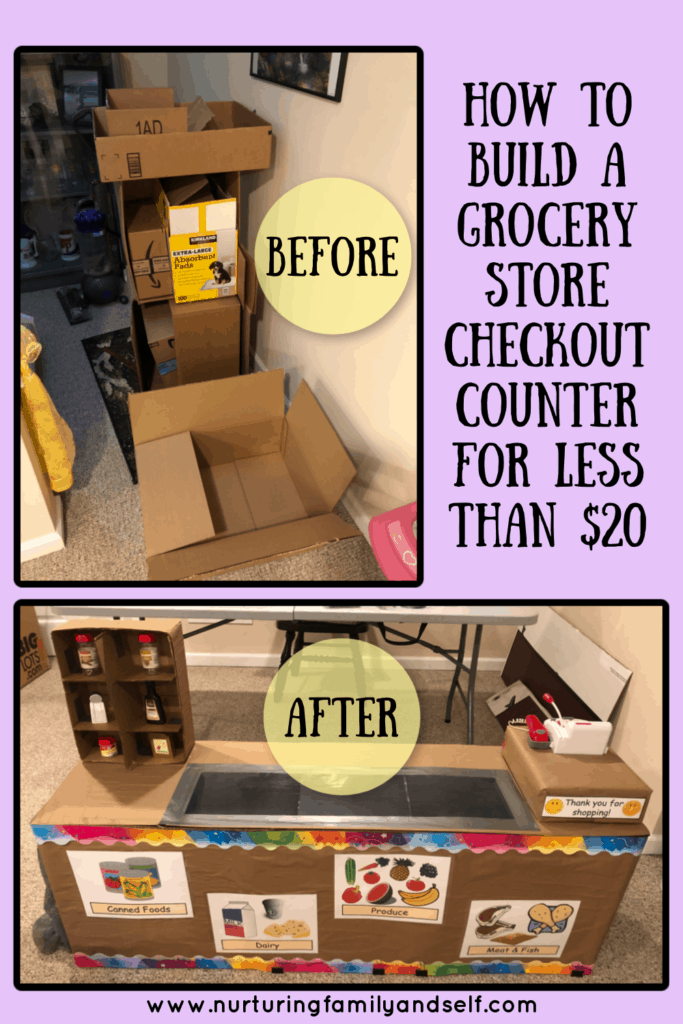
There are so many wonderful play grocery stores out there to purchase, but I decided I wanted to make my own using cardboard boxes. Our collection of cardboard boxes is on the larger side with all of our recent online purchases, but I knew they would come in handy! I love to create things for my kids and this was a project I was looking forward to completing for them. The best part is it cost less than $20 to put together this grocery store checkout counter. That’s definitely less expensive than the ones you buy at the store!
I was eyeing up this grocery store before I made the decision to build my own. The realistic look to it caught my eye, as well as the shelves for housing food items! I just LOVE anything from Melissa & Doug. We have so many of the Melissa & Doug food playsets. My kids LOVE engaging in pretend play with them (and so do I 😉)!
When I say grocery store, I built a grocery store checkout counter from cardboard boxes. I did not build a full grocery store. We already have a pantry set up to store the play food. We use a white cube shelf as our pantry shelf and an open bin storage unit for the rest of the food, dishes and utensils.
What do you need to build a cardboard grocery store checkout counter?
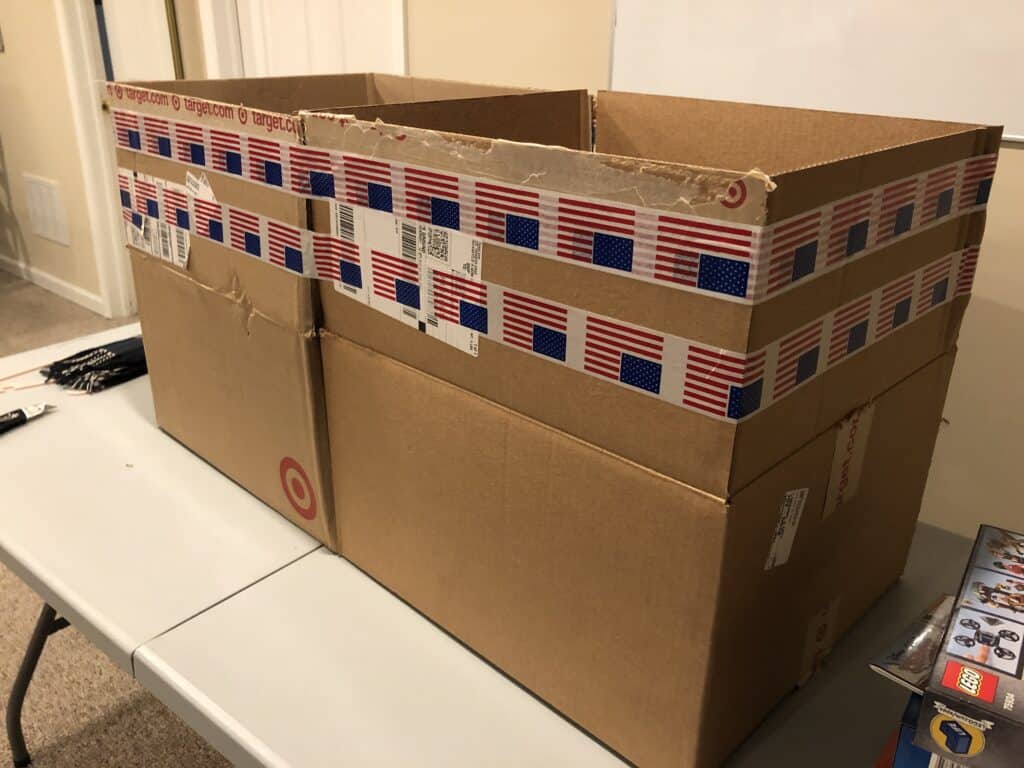
You will need 3 cardboard boxes of the same size. We happened to have them already, but these moving boxes are the perfect size for building this grocery store checkout counter. They are very inexpensive and sturdy. You can find them at Lowe’s for $1.44/box or Target for $3.99/box. Office supply stores also sell this type of box. The size that works well for this project is 18x18x16.
You will need clear packing tape to seal the boxes together and cover the seams.
You will need a hot glue gun and hot glue to adhere the boxes together.
Once the boxes are glued and taped together, you will need something to cover them up to give a uniform look and hide the symbols, words and numbers on the boxes. We had this brown kraft paper and that is what I chose to use. I attached it using white craft glue. I wasn’t happy with the wrinkles that appeared even after I tried really hard to lay it on smoothly, but it did the job of giving the grocery store counter a uniform look and covering all the imperfections on the cardboard boxes. What I would do differently is purchase contact paper from the Dollar Store and use that to cover the boxes. This is great because it’s more durable than the craft paper. The contact paper can be wiped clean and doesn’t rip easily.
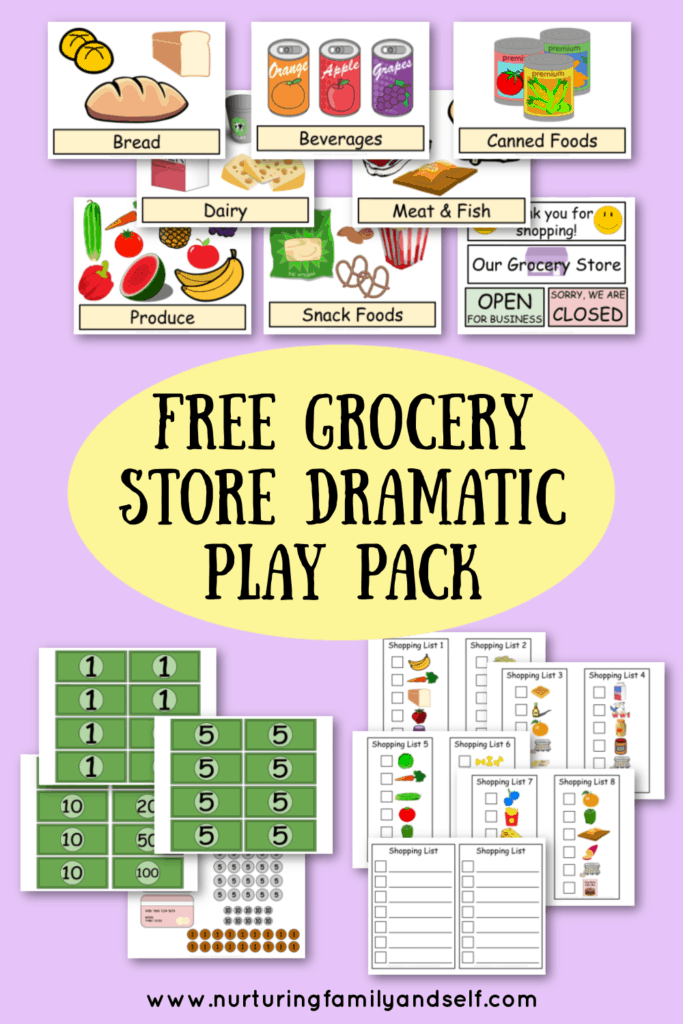
You will also need white cardstock to print the grocery store labels, signs, shopping lists and play money included in this free grocery store dramatic play pack. A laminator and laminating sheets will be needed during this step, too! Clear contact paper or clear packing tape is another way to preserve the printed items.
You will need aluminum foil or black construction paper and clear packing tape to create the belt for placing the food on during checkout.
How do you build a grocery store checkout counter?
Assemble & Tape Together Cardboard Boxes
First, you need to unfold and tape together the top and bottom of each cardboard box.
Next, use hot glue to adhere the boxes to each other. Put hot glue all around both sides of the middle box and push the other two boxes against each side, applying pressure for a few minutes.
After that, use the clear packing tape to cover the seams between the boxes. Wrap the tape all around, covering the top, bottom, and sides. This will not only cover the seams between the boxes, it adheres the boxes to each other in addition to the hot glue. It will reinforce the boxes.
As you can see in the image below, I used slightly different boxes and left the bottom open so they were an appropriate height for my kids. Therefore, I glued the middle flaps together and proceeded to tape around to reinforce the boxes.
Cover the Cardboard Boxes in Contact Paper
Now that the boxes are all glued and taped together, it is time to cover them in contact paper. You can decide if you want to use the same contact paper for the top and sides or do one pattern on the top and one pattern around the sides. I like the wood grain contact paper for the sides and a lighter one for the top.
I would start with the top of the boxes. Start by peeling the contact paper away to expose the sticky side. Place a little bit over the edge of one end of the boxes. Then slowly lay the contact paper across the top. Leave a little hanging over the end of the top and trim off the excess.
Now it is time to do the sides. Lay the grocery store checkout counter on its side and follow the same process as the top for placing the contact paper. The one difference is when you get to the end, turn it over to continue wrapping around. You will most likely need two rolls of contact paper for this step.
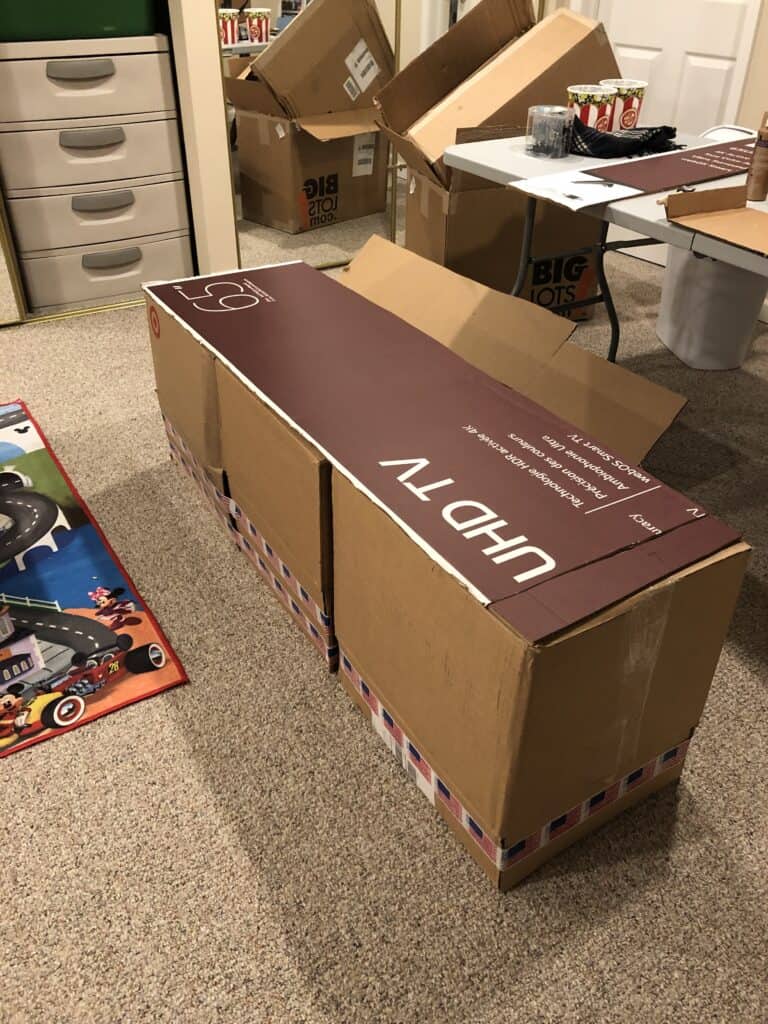
In order to create a smooth, even surface for the grocery store checkout counter, I cut a piece of a large box from a TV the length and width of the top. Then, I glued it on top. The boxes I was using for this were not in the best condition and slightly uneven. When you use the moving boxes I suggest and put the taped sides to the front and back as opposed to the bottom and top, your surfaces will be plenty smooth and sturdy.
You don’t need to worry about covering the bottom because it will not be seen. Place your grocery store checkout counter back with the top up. Now you are going to take the clear packing tape and wrap it all around the top edge to prevent the contact paper from peeling off.
The craft paper didn’t cover the entire surface of the boxes I used. Therefore, I used some leftover bulletin border from my teaching days to add some fun pops of color while covering the rest of the boxes. I love how it turned out.
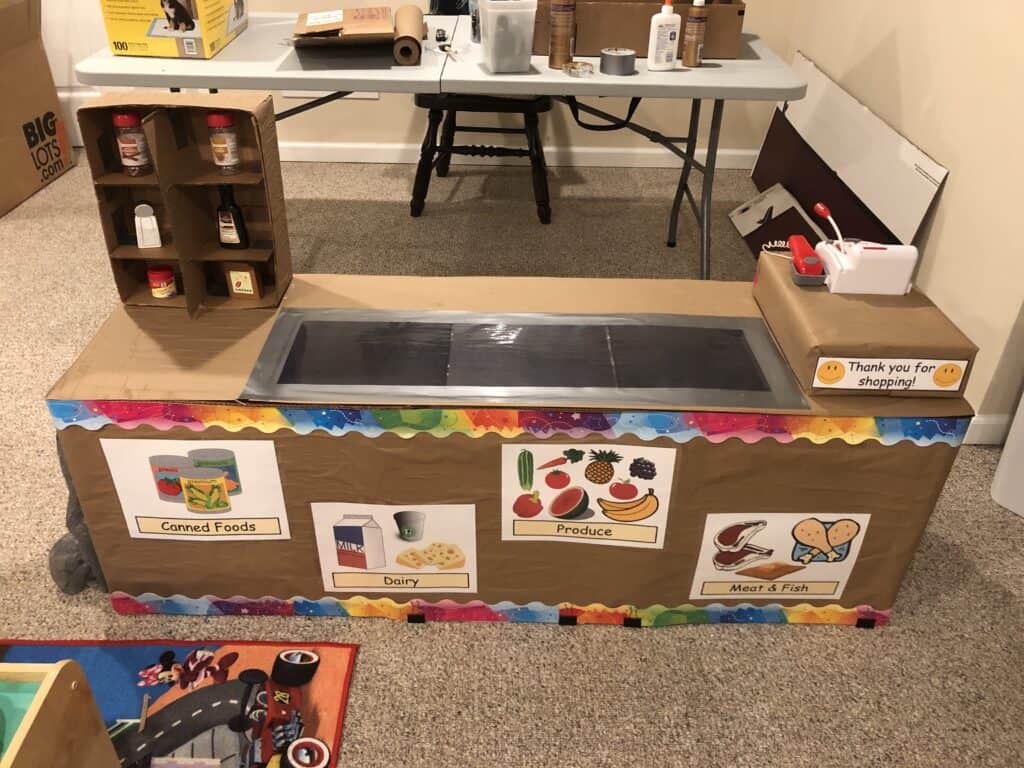
The hard part of building the grocery store checkout counter is finished. Now it is time to add the embellishments that bring it to life and make it look like a true grocery store checkout counter.
Embellish Your Grocery Store Checkout Counter with Colorful Signs
The first embellishment we are going to add is the conveyor belt where the food goes. There are two ways to do this and it’s really your preference! I chose to take 3 pieces of black construction paper, trimmed down to 8 ½ by 11. I cut the paper down so it would fit in the laminating sheets I used to laminate them. Then I placed them on the top of the grocery store checkout counter. I used white craft glue to adhere them to the top. Next I outlined with silver duct tape.
The other way to create this conveyor belt is by gluing a sheet of aluminum foil down and using the silver duct tape to outline and cover edges. Either way, your kids will love placing their food on the conveyor belt!
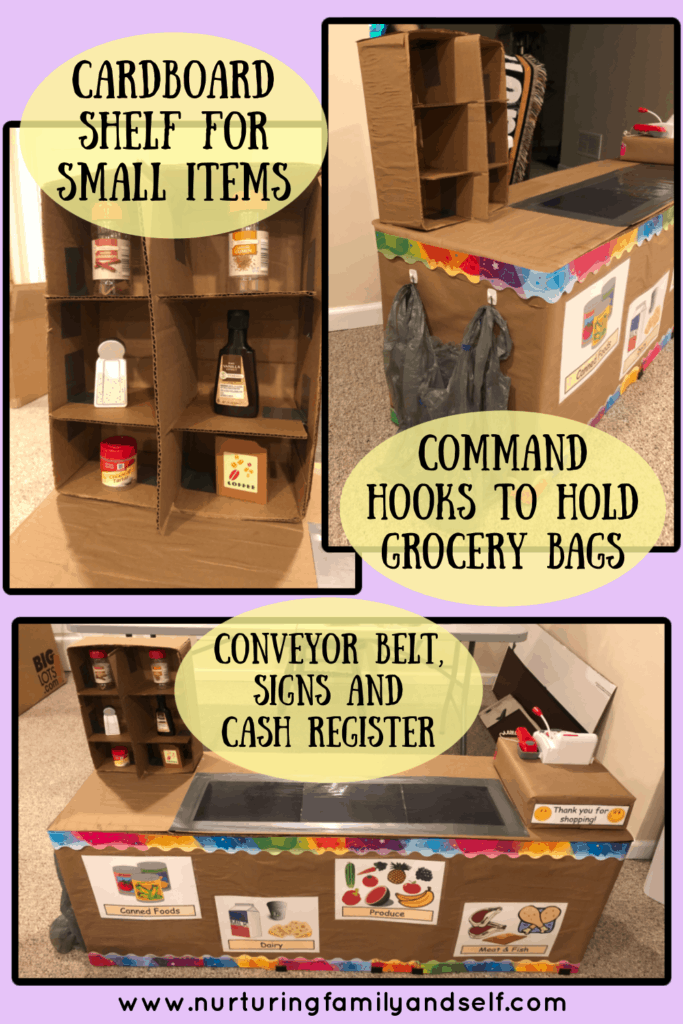
Additional embellishments include grocery store signs. This free grocery store dramatic play pack includes everything you need to embellish your child’s grocery store checkout counter and engage him/her in hours of pretend play and learning. There is a set of colorful signs for each food group. I printed, laminated and glued onto the front of the grocery store checkout counter.
A small box makes the perfect display shelf for smaller items, just like at the real grocery store! I cut pieces of cardboard to size, glued inside the box and reinforced with duct tape to form the shelves. When I made this small shelf, I was using the white craft glue. The white craft glue takes longer to dry. That’s why I added pieces of duct tape. It did okay, but the hot glue works much better at adhering the cardboard. So I highly recommend using hot glue during this part of the project.
How do you set up a grocery store checkout counter for pretend play?
You will need several grocery store props to finish setting up your grocery store checkout counter. Here is a list of the props you will need to bring your grocery store to life and engage your kiddos in lots of fun pretend play:
- Reusable Grocery Bags
- Cash Register
- Play Money
- Shopping Cart Small
- Shopping Baskets
- Shopping Lists
- Grocery Store Ads
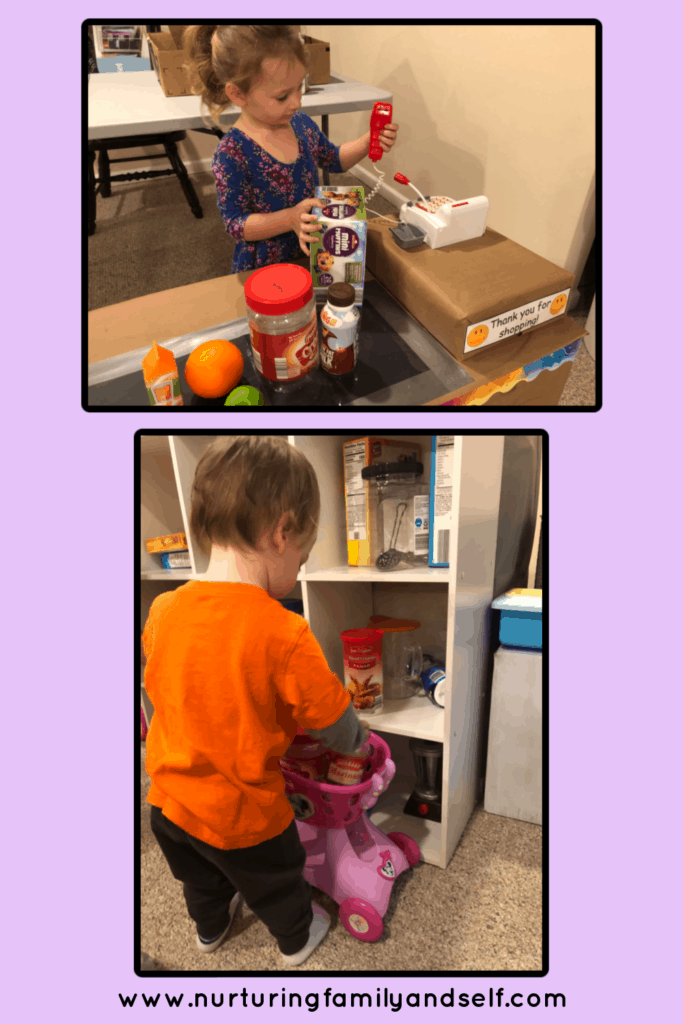
Use recycled and cleaned out food containers for the food items. My kids love playing with these food containers because they came right from our own kitchen. It’s fun to buy “real” groceries!
We’ve also purchased different sets of pretend food over the years. It’s a great gift idea for birthdays and Christmas, too! This way we have a variety of fruits, vegetables, meat and dairy items. I believe that a play kitchen and all its accessories really grows with your child and lasts a long time.
We use a cube shelf, baskets and/or clear shoebox bins to organize, store and display the food. Labeling the bins makes it really easy for my kids to clean up the food when play ends. The labels also add a literacy opportunity for them. It creates a print-rich environment and helps them practice organizing and sorting. They “read” the labels as they clean up the play food and grocery store accessories.
Another great way to set up produce and food for your grocery store is using craft items such as colored pom poms, pipe cleaners and felt. You can use blue pom poms for blueberries and red ones for cherries. You can cut pieces of orange pipe cleaners into smaller pieces for carrots or cut pieces of colored felt into the shape of vegetables and fruit! Check out this post from Pocket of Preschool to see how she set up her grocery store dramatic play using craft items and recycled food containers. Here’s another post that shows how to make easy felt fruits and vegetables that require no sewing or pattern.
What are the benefits of grocery store dramatic play?
Dramatic Play allows young children to learn through play. So many social and academic skills can be learned during dramatic play. You can read more about them in this post about pretend play.
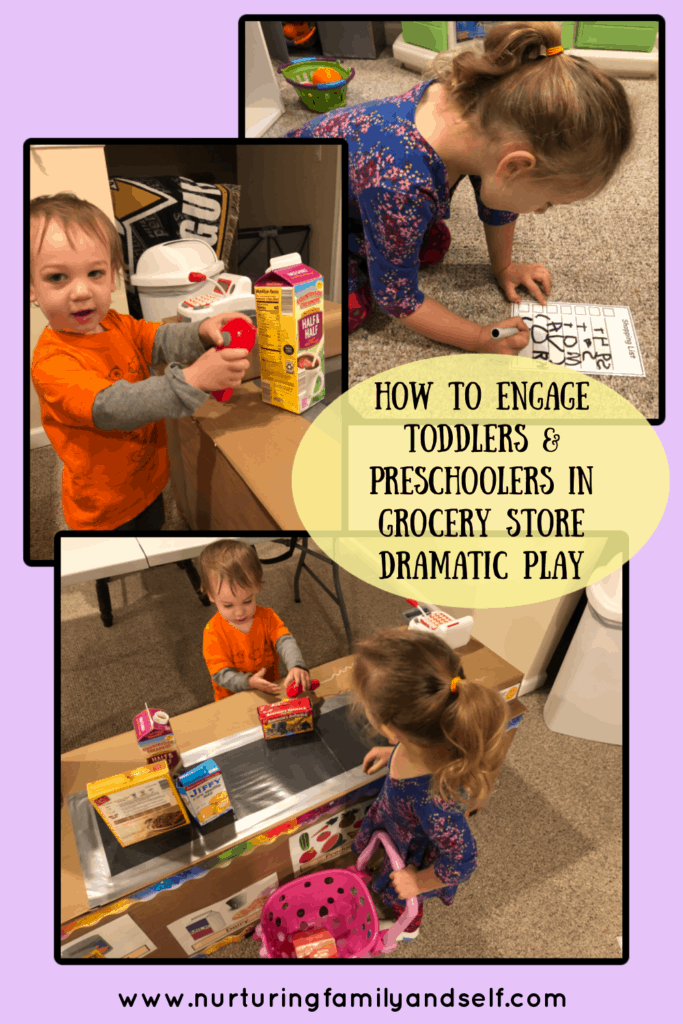
My daughter loves pretending to be mom, shopping at the grocery store. I present a problem and we follow the steps to solve this problem. For example, “We don’t have anything to eat for dinner tonight. We need to go to the grocery store and buy some ingredients to make dinner.” We work together to decide what we will eat for dinner. Then I help my daughter make a shopping list, which is a great way to encourage her to practice writing her letters. Next we go shopping and buy the ingredients we need!
I created shopping lists for my kids to use when we engage in grocery store dramatic play. There are two blank ones and then a few other ones I made based on the food we have in our play kitchen. The ones that include pictures of food items are perfect for my youngest because he isn’t writing yet. I printed them on thicker paper, such as cardstock, and laminated them so we could use a dry erase marker to write our food items or check off the items as we purchase each one. I put them all on a ring to keep them together, but a small clipboard or ziploc bag would work as well!
Your child is also building knowledge of math and literacy concepts while engaged in playing grocery store. Here are all the math and reading skills your children are learning and practicing while engaged in play:
- Writing Letters & Words
- Counting
- Following the Steps in A Process
- Building Vocabulary
- Sequencing
- Reading Food Names & Environmental Print
- Classifying
- Language Development
- Expressive Language
More Learning Activities with Grocery Store Play
Playing grocery store is a wonderful way for your toddlers and preschoolers to learn about their community and community workers. You can spend time reading books about grocery stores and talking about the different sections of a grocery store, how the food gets to the grocery store and the various jobs there are at the grocery store. I’m all about using books as the starting place for play and learning. Books help build background knowledge and create a common language as we learn about a specific theme/topic. The illustrations, photos and words within the book jumpstart conversation and spark questions, too!
Obviously, the grocery store is a great extension to the preschool theme of food and nutrition. I mentioned building the grocery store checkout counter was on my list for a long time, but decided to finally take action and build it during our unit on foods from Playing Preschool Year 1. Even after we finished this unit, my kids continue to play with it.
A fun game to play with your preschoolers is to assign them a letter of the alphabet. Then, have them shop for all the food items that start with a specific letter. “Let’s fill our carts with all of the food that starts with R”. Then count how many items they found that started with the letter. Repeat this for a few more letters. For younger kiddos who don’t know their letters just yet, have them fill their basket with items of a specific color or look for specific shapes on food containers. We are focusing on colors with my son so he searches for all the red food items while my daughter looks for items that start with the letter R. They can play and learn together even at different ages and learning levels.
Conclusion
So you can build a grocery store checkout counter and engage your children in lots of learning and play as you play grocery store together. For less than $20, you can set up a realistic grocery store that leads to hours of play right in your own house. There are so many ways to structure your child’s play in a way to incorporates reading, math, and social skills.
Click on the image below to grab your free grocery store dramatic play pack and start engaging your toddlers and preschoolers in learning and play today!
That is so creative! Thanks for the idea.
Thank you so much for checking it out! I love to create things for my kids and this was so much fun to put together!
What a neat idea!! My son LOVES getting to go to the grocery store with me and is at the age where he’s loving dramatic play. I’m going to show this to my husband so we can create one too!!
Thank you so much for the comment!! It’s so fun when they enter the stage of loving dramatic play. It’s definitely one of my favorite times. Have fun putting one together for your son! I can’t wait to hear how he likes it.
This is so great and relatively easy to make! I love pretend playing, and fake food/cash register items were my favorite when I was a kid. I agree with you about Melissa and Doug toys; they are all so great! I am definitely going to have to get some of those food playsets.
Thank you so much! Yes, it was not too hard to make! It takes time, but the finished product is so worth it. Pretend play was always my favorite way to play as a child, too! Every birthday and Christmas, we ask for the Melissa and Doug food playsets. They are great gift ideas for little ones 😉❤
This is so cute and such a great idea. My mini will love it. I need to make one ASAP. Thanks so much!
Thank you so much!! It was such a fun project for me and my kids love it. I knew I had to share how I put it together 😊
So disappointing that the link doesn’t do anything. I’ve put my email in 3 times and every time it sends me an email that says I have signed up for the newsletter which is fine and good but I really wanted the printable for the grocery store. I guess that’s an issue on Pinterest because it happens all the time. I hope that it isn’t spam. Let me know when this is fixed maybe I’ll come back but until then I’ll be telling friends to not waste their time.
Thank you for bringing this to my attention! I apologize that the link is not working. This is the first I am hearing about it. I will take a look and get it fixed. In the meantime, I will send you the printable for the grocery store via email. I appreciate you stopping by to check out the post and printable, though!
Hi there – I cannot access the printable grocery pack through your email?
Looking forward to hearing from you
I just sent you an email with the printable pack access. Thank you so much for joining our community! Enjoy your freebie 🙂
how am i able to print this?
Hello! Thank you for your interest in the Grocery Store Printable Pack and for checking out the post. After you put your email in, it should arrive to your inbox. A PDF will open and you can print from there. Let me know if it doesn’t work for you!
Hi there can you please email me the printable grocery pack.
Thank you for your interest in the printable grocery pack! I sent you an email with a link to the file. Let me know if you have any other questions!
The link for the free grocery store printable isn’t working. Could you possibly email it to me?
Thank you for letting me know! I have emailed the link to you. Let me know if there is anything else I can do for you! Enjoy the printable 🙂
The Link is not working, can you possibly email me the link or the file please.
Please check your email. I have resent the link to you. Let me know if it does not work for you 🙂
I have put my email in twice with no luck! Can you please send the link to me? Thanks
Please check your inbox. I resent you the printable. Thank you for letting me know you did not receive it!
I am unable to get the PDF when clicking on the image. Could I also get a copy? Thanks
Please check your inbox! I have resent the printable pack. Let me know if it doesn’t work for you and if there is anything else you need 🙂
I cannot get the printable. Can you please email it to me?
I apologize that it did not arrive in your inbox. I have resent it to you. Please let me know if it doesn’t work 🙂
The link doesn’t work.
Can you please re send it to my email. Thank you.
I sent the link to your email! Thank you for letting me know you didn’t receive it.
Hi,
I didn’t receive an email for the printable, just a welcome email. Thank you for the great ideas and resources, I will be using them in my preschool room.
Thank you for stopping by! I’m glad you are able to use the resources in your preschool room. I apologize that the link didn’t come through your email, but I just resent it to you. Let me know if there is anything else you need!
Thank you for sharing these wonderful ideas! Are the printables still available? I entered my email but only got a welcome note.
Thank you for stopping by and letting me know you didn’t receive the printable! I have resent an email with the link to the printable. Let me know if there is anything else you need!
Hi, I only received a welcome, not the link.
I resent the email! Thank you so much for your interest 🙂